You will occasionally get errors about temporary directories that are failing to be created properly. To be honest, I don’t know what the cause of this is. It seems that either my setup (more likely) or HAVP is not production ready. If you force reload the page (ctrl + F5) the page should load properly afterwards. Also, after I wrote this tutorial, I realised that there was a HAVP RPM in the Dag repository. If you want to tweak this setup to use the Dag RPM, go ahead. Configuration file locations may vary though, so I cannot guarantee that these instructions will be completely portable.
I have had some trouble with finding a suitable solution for virus scanning using Squid. I tried squidclam which I didn’t have too much success running. There was also a plug-in for DansGuardian that provided virus filtering but I didn’t want the overhead of Dans and only wanted the virus scanning. Most of this guide is taken directly from http://www.opensourcehowto.org/how-to/squid/squid-clamav–havp.html with a few adjustments that were needed for my setup.
This setup assumes that you using CentOS 5 and already have Squid running and installed. If you need to setup Squid, Google is going to be your friend. There are heaps of tutorials around dealing with this. Also, if you run any redirect scripts such as Adzapper, this is fine as we will not be using this functionality of Squid to plug-in, but setting up a cache peer. More on that later.
Установка ClamAV
If you have not got Dag Wieers repo you will need to add this to the /etc/yum.repos.d/ directory to install ClamAV. Create a file in the yum.repos.d directory, /etc/yum.repos.d/Dag.repo and add the following:
[dag]
name=Dag RPM Repository for Red Hat Enterprise Linux
baseurl=http://apt.sw.be/redhat/el$releasever/en/$basearch/dag/
gpgcheck=1
gpgkey=http://dag.wieers.com/packages/RPM-GPG-KEY.dag.txt
enabled=1
We will need the development tools to compile HAVP. Install these and ClamAV with the following commands.
yum groupinstall "Development Tools"
yum install clamav clamav-devel
This will take some time. You could probably install the tools that you will need to compile HAVP by hand, but the Development Tools meta-package will alleviate some headaches later on. An updater script will be placed in /etc/cron.daily/freshclam. Modify the frequency of this to your own needs.
Now we will download HAVP and compile it. Head over to http://www.server-side.de/download.htm to get the latest version. 0.87 was the most current at the time of writing.
cd /tmp
wget http://www.server-side.de/download/havp-0.87.tar.gz
tar zxvf havp-0.87.tar.gz
cd havp-0.87
./configure
make
make install
Настройка HAVP
This will install most of the files in /usr/local. Before we start messing around with the config file, we need to create a new user account for HAVP to run under and create a few directories/change some permissions.
First we will add the havp user
adduser -c "HAVP proxy virus scanner" -M -s /bin/false havp
Now we need to change the permissions of some directories that HAVP uses
chown -R havp:havp /var/run/havp
chown -R havp:havp /var/log/havp
HAVP requires a directory to store its temporary files. This file system MUST have mandatory locking enabled to function. We can cheat a bit to get around this by creating an image file and then mounting the image on the file-system with locking enabled. For this we will use the command dd.
dd if=/dev/zero of=havp.img count=1 bs=256M
This will create the image, havp.img with a size of 256 MB. Change the size to suit but I feel 256 MB is about enough. Move the image to an appropriate directory, format it and then mount it. This shown below.
mv havp.img /usr/
mke2fs /usr/havp.img (You will get some errors about doing this operation, Just accept them).
mount -o loop,mand /usr/havp.img /usr/tmp/havp
chown -R havp:havp /usr/tmp/havp
We will also want this to mount at boot time so add the following to your /etc/rc.local. I originally added a line in my fstab, but realised this didn’t work when my machine failed to boot properly next time i rebooted it.
mount -o loop,mand /usr/havp.img /var/tmp/havp
Конфигурирование HAVP
Now its time to configure HAVP. Open /usr/local/etc/havp/havp.config in your favorite editor. Everything is commented out. There are a lot of defaults set, but we will take away a lot of the commented out lines just so we know exactly what is going on. Below are all the changes you will want to make.
#REMOVETHISLINE deleteme
USER havp
GROUP havp
DAEMON true
PIDFILE /var/run/havp/havp.pid
SERVERNUMBER 20
MAXSERVERS 100
ACCESSLOG /var/log/havp/access.log
ERRORLOG /var/log/havp/havp.log
LOG_OKS false
LOGLEVEL 0
SCANTEMPFILE /var/tmp/havp/havp-XXXXXX
TEMPDIR /var/tmp
PORT 8081
BIND_ADDRESS 127.0.0.1
SCANIMAGES false (leave this enabled if you have a fast machine)
MAXSCANSIZE 5000000
KEEPBACKBUFFER 200000
ENABLECLAMLIB true
You will only really want to change settings relating to the scan size, buffers and streaming options. Also enable image scanning if you have the grunt.
Save and start HAVP using the init script that it installed
/etc/init.d/havp start
The HAVP init script does not work with chkconfig, so we can just tell it to start upon system boot by entering it in the /etc/rc.local file.
echo "/etc/rc.d/init.d/havp start" >> /etc/rc.local
Check the logs to make sure that it has started properly. The logs a pretty useful and do give you a good indication to the cause of a problem if you have one. It will most likely be problems with permissions so checking these will be a good start.
Конфигурирование Squid
Lastly we need to add HAVP as a cache peer of Squid, Open the /etc/squid/squid.conf file and enter the following line.
cache_peer 127.0.0.1 parent 8081 0 no-query no-digest no-netdb-exchange default acl FTP proto FTP
always_direct allow FTP
always_direct allow SSL_Ports
Тестирование
Now restart Squid. Once Squid as restarted and all calmed down (the AdZapper script initially seems to add quite a delay to Squid responding once it has started), check you can initially access the web. If this is fine, we can now test our virus scanning. A special test signature called “eicar” has been created for the purpose of testing anti-virus programs. Head over to http://www.eicar.org/antivirustest_file.htm and try to download one of the files (through HTTP). If all goes well, you should receive a message such as shown below.
Для проверки заходим на http://www.eicar.org/anti_virus_test_file.htm и пытаемся качать:

http://www.eicar.org/download/eicar.com.txt

http://www.eicar.org/download/eicar_com.zip

http://www.eicar.org/download/eicarcom2.zip
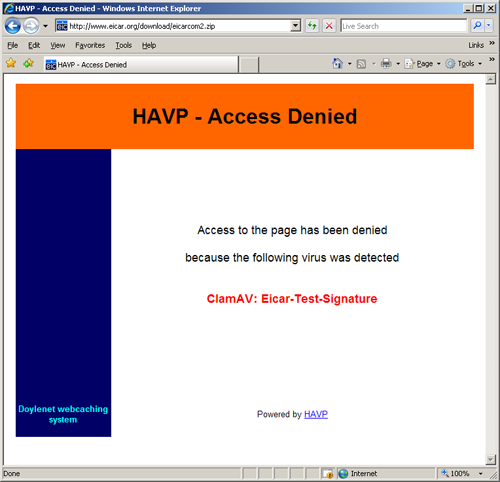
If you have got to this point, congratulations. If you are still having trouble, check the Squid logs as well as the HAVP logs. You might want to change the verbosity of the HAVP logs to check exactly what is happening. Remember, this is definitely not bulletproof. Both the fact that ClamAV is not the best engine for detecting viruses as well as the fact that only a certain file size will be scanned.
Источник: http://ryandoyle.net/posts/active-http-virus-filtering-with-squid-and-clamav-using-havp/